Showing posts with label tutorial. Show all posts

Thursday, February 26, 2009

Mercurial "case-folding collision" More Explanation on the fix

I've run into this error now a few times. What happens is you rename a file, changing only the case of one or more characters in the file name. This causes confusion. Now you can read here and here about the fix to this problem. I'm going to give a little more info on how to make this work, just because it might not be crystal clear reading those two sources.

You got this error either by checking out the project, or pulling changesets into your project and trying the 'update' command. So run these commands:

hg debugsetparents <revision>

The revision should be the one you are attempting to update to.

hg debugrebuildstate

now you want to remove all the files in error, you can use 'hg manifest tip' to check for the files in error. I've had more than one before after doing numerous renames that camel cased a number of files. use:

hg rm -A <filename>

to remove files, you can list multiple files to delete using spaces between each.

Once you've removed the files you should commit the changes:

hg ci -m "Fixed case problems"

Then do a clean check out the tip revision:

hg co -C tip

thats it, hope this helps to shed a little extra light on the process.

Tuesday, February 24, 2009

Using sort and uniq to find duplicate lines in a file

I love my Mac, mostly because I can run all those great Unix utilities that make tasks easy. Today I want to point out a pair of tools that come in handy often. They are sort and uniq.

sort can be used to sort the lines in a given file. A simple use would be

echo -e "c\na\nb" | sort

which produces:

a
b
c

Sweet! Now lets look at the sort program:

echo -e "a\na\nb\nc\nb" | uniq

gives:

a
b
c
b

Removing the duplicate a, but not the b! The tool only removes any consecutive duplicate lines. So what if you want to remove all duplicates? Easy:

echo -e "a\na\nb\nc\nb" | sort | uniq

gives:

a
b
c

Taa Dah! Thats easy!

Now this duo can be used in very many useful ways. Just the other day I needed to find two XML elements that had the same value. I used 'sed' to pull out all the values in the given element, sort to put these values in lexographically sorted order, and uniq to tell me the duplicates found:

sed -n 's/.*<tag>\(.*\)<\/tag>/\1/p' | sort | uniq -d

For the 'sed' part you could put any tag name in there you need to find duplicate value for. should be the name of the file you are using. Notice that each XML element was on it's own line, so this wouldn't work for documents that are not formatted nicely (for that see xmllint :).

Tuesday, January 13, 2009

Potion: Installing and Running

New to the computer language scene is Potion. This language is the work of Why (or Why the luck stiff if you like typing) a guy who created a wonderful guide to learning the Ruby programming language.

Potion is a very 'small' language in both terms of lines of code to implement and the tools and API of the language itself. Batteries are not included as they are in well established languages such as Python. NO SWEAT, this of course is why you are interested.

First things first you'll need to have Git installed. Git is source control software. I am on Ubuntu and so I just typed in the command 'sudo apt-get install git-core'. That should do it... oh not on Ubuntu well then go here and figure it out.

Second you are going to need Ragel. Ragel is a state machine compiler. Potion uses it to create the source code tokenizer. Again I used apt-get: 'sudo apt-get install ragel' and voila I had myself some Ragel. You might need to go here and download it or something.

Lastly you need the Potion source. Using Git you will download this. You should be able to type
git clone git://github.com/why/potion.git potion
and you'll now have the folder 'potion' containing the sources.

Now you'll want to change to the 'potion' folder. Type 'make' to start the process of building Potion.

Once finished copy the potion executable create in the make step into your local bin folder. For me that is '/home/rob/bin'. Make sure this folder is on the path. Now you can run potion anywhere. test it out using the command 'potion examples/fib.pn'. This will run the simple fibonacci app in the example folder.

Now you are ready to build a great program!

Saturday, January 3, 2009

MySQL and Unicode

I just wanted to point out. MySQL STILL uses ISO-Latin-1 as the default encoding. LAME!!! I ran into again the problem today of having to set up my production database to use UTF-8. Not a difficult thing, but a hassle none the less. The thing is in these days everyone is using UTF-8, I mean i18n and l13n are two big deals. Some web programming frameworks make it a huge point of how well they handle the two.

Well anyway what to do? I had already created the database and tables, in the default ISO-Latin-1 encoding, and there was a few months of data in them. Therefore I had to start by fixing the encoding on the database and tables. Here are the commands that can make this happen:
alter table xxx character set = utf8;
alter database xxx character set = utf8;
Of course insert your table and database names. Now any new tables created in the database will have utf8 encoding. You probably WANT to make sure that everything in your database is UTF-8. The best way I know of doing this is my setting the proper values in the my.cnf file in /etc. If the file is not in /etc then you probably will need to create it. If someone else admins the machine and installed mysql there is a possibility also that the file is in another castle, er sorry location.

So crack open the my.cnf and insert this line:
default-character-set=utf8
Thats it, restart MySQL. To test this out create a new database, then a table in the database. Issue the 'show create table xxx' where xxx is the table name, you should see some text indicating it has UTF-8 as the encoding.

Thursday, October 16, 2008

Eclipse, Tomcat, Sysdeo and the DevLoader (and a little Maven)

If you are developing a webapp in Eclipse there is a very good chance you are using Sysdeo. If you are not there is a very good chance you have not yet learned a proper way to debug a Java web application (or maybe you are using Jetty?). Sysdeo is really the only good open source, free Eclipse plugin for developing with Tomcat. It allows a simple way to debug your code in Eclipse while it runs in Tomkitty, a very nice thing.

Now the problem with the plugin out right is your project must be laid out like an exploded war... YUCK! This is because Sysdeo will be looking for the lib files under WEB-INF/lib and such. Often I've seen this lead to some truly horrible project organization, where jsp and Ant build files co-mingle in the same folder!?!

Most of us use a sane Ant or Maven project layout that is standardized across all our Java projects. If you want to continue doing so and leverage the benefits of Sysdeo then you will need the DevLoader installed.

If you haven't downloaded and installed the Sysdeo plugin do so now, I will wait ;)

Go here to get Sysdeo!

Ok once installed you should see 3 icons under the Eclipse menu bar that look very familiar (they are Tomcats!). The first icon starts Tomcat, the second stops it and the third restarts. Now open the Eclipse preferences menu. You should see the "Tomcat" entry. Open it and configure the plugin based on your Tomcat installation. You will want the "Context Declaration mode" to be "context" in my experience. It just makes things a lot cleaner if you use Tomcat for other projects/apps, where they each have individual files rather being crammed in server.xml. That should be about all you need to know. Oh the sub-menu 'Source path' is for adding the source files used in debugging, so make sure your project is in there if you want to be able to see the files while debugging.

Next up the DevLoader. It came with the Sysdeo plugin when you download it! You should find a zip file in the the Sysdeo zip aptly named Devloader.zip. Unzip it. It will create an org folder, within lies some classes. Jar this sucker up:

jar cf devloader.jar org/

This should create a jar for the DevLoader. Now throw this in your Tomcat instance's lib folder.

Great now you have almost everything you need to get started. Lets go over an example of a Maven project being used.

In Maven the webapp files go in src/main/webapp by convention, and sources go in src/main/java, and the resource files (xml, properties) go into src/main/resources. For your Maven project you would right click the project and select properties. You should now notice a 'Tomcat' entry in the config options. Select this.

Enable the "Is a Tomcat Project" checkbox. For the 'context name' use whatever sane value you prefer. Near the bottom area you will want to enter 'src/main/webapp' for the app root. This is where most jsp, html, javascrpt, css and whatnot will be. You will be able to update these and see the result. Now the last thing we need to do is activate the devloader. Here is a picture of what that looks like:
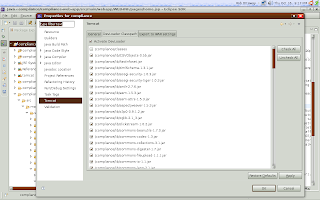
So really all you do is add the jar files needed. Thats it. Now save. If you are not going to create a context file yourself, and you enabled 'can update context definition' in the projects tomcat properties you can right click the project and select "tomcat project > update context definition". This will automatically create the proper context file for Tomcat, so that it uses the DevLoader and your project. You almost certainly will want to do this. Note you can further alter the automatically created context file afterwards.