I've released a latest version of a simple OAuth client I developed. You can find version 1.1 of the jar here. Also the site for the project is here, and finally the source is here. I should have some documentation on basic usage up later.
So far the library only supports the HMAC-SHA1 method of signing, and is using query parameters to send the OAuth information. Soon I'll add support for using headers and POST data to send the OAuth information.
Showing posts with label development. Show all posts
Showing posts with label development. Show all posts
Thursday, February 19, 2009

Saturday, January 3, 2009
MySQL and Unicode
I just wanted to point out. MySQL STILL uses ISO-Latin-1 as the default encoding. LAME!!! I ran into again the problem today of having to set up my production database to use UTF-8. Not a difficult thing, but a hassle none the less. The thing is in these days everyone is using UTF-8, I mean i18n and l13n are two big deals. Some web programming frameworks make it a huge point of how well they handle the two.
Well anyway what to do? I had already created the database and tables, in the default ISO-Latin-1 encoding, and there was a few months of data in them. Therefore I had to start by fixing the encoding on the database and tables. Here are the commands that can make this happen:
So crack open the my.cnf and insert this line:
Well anyway what to do? I had already created the database and tables, in the default ISO-Latin-1 encoding, and there was a few months of data in them. Therefore I had to start by fixing the encoding on the database and tables. Here are the commands that can make this happen:
alter table xxx character set = utf8;Of course insert your table and database names. Now any new tables created in the database will have utf8 encoding. You probably WANT to make sure that everything in your database is UTF-8. The best way I know of doing this is my setting the proper values in the my.cnf file in /etc. If the file is not in /etc then you probably will need to create it. If someone else admins the machine and installed mysql there is a possibility also that the file is in another castle, er sorry location.
alter database xxx character set = utf8;
So crack open the my.cnf and insert this line:
default-character-set=utf8Thats it, restart MySQL. To test this out create a new database, then a table in the database. Issue the 'show create table xxx' where xxx is the table name, you should see some text indicating it has UTF-8 as the encoding.
Thursday, October 16, 2008
Eclipse, Tomcat, Sysdeo and the DevLoader (and a little Maven)
If you are developing a webapp in Eclipse there is a very good chance you are using Sysdeo. If you are not there is a very good chance you have not yet learned a proper way to debug a Java web application (or maybe you are using Jetty?). Sysdeo is really the only good open source, free Eclipse plugin for developing with Tomcat. It allows a simple way to debug your code in Eclipse while it runs in Tomkitty, a very nice thing.
Now the problem with the plugin out right is your project must be laid out like an exploded war... YUCK! This is because Sysdeo will be looking for the lib files under WEB-INF/lib and such. Often I've seen this lead to some truly horrible project organization, where jsp and Ant build files co-mingle in the same folder!?!
Most of us use a sane Ant or Maven project layout that is standardized across all our Java projects. If you want to continue doing so and leverage the benefits of Sysdeo then you will need the DevLoader installed.
If you haven't downloaded and installed the Sysdeo plugin do so now, I will wait ;)
Go here to get Sysdeo!
Ok once installed you should see 3 icons under the Eclipse menu bar that look very familiar (they are Tomcats!). The first icon starts Tomcat, the second stops it and the third restarts. Now open the Eclipse preferences menu. You should see the "Tomcat" entry. Open it and configure the plugin based on your Tomcat installation. You will want the "Context Declaration mode" to be "context" in my experience. It just makes things a lot cleaner if you use Tomcat for other projects/apps, where they each have individual files rather being crammed in server.xml. That should be about all you need to know. Oh the sub-menu 'Source path' is for adding the source files used in debugging, so make sure your project is in there if you want to be able to see the files while debugging.
Next up the DevLoader. It came with the Sysdeo plugin when you download it! You should find a zip file in the the Sysdeo zip aptly named Devloader.zip. Unzip it. It will create an org folder, within lies some classes. Jar this sucker up:
This should create a jar for the DevLoader. Now throw this in your Tomcat instance's lib folder.
Great now you have almost everything you need to get started. Lets go over an example of a Maven project being used.
In Maven the webapp files go in src/main/webapp by convention, and sources go in src/main/java, and the resource files (xml, properties) go into src/main/resources. For your Maven project you would right click the project and select properties. You should now notice a 'Tomcat' entry in the config options. Select this.
Enable the "Is a Tomcat Project" checkbox. For the 'context name' use whatever sane value you prefer. Near the bottom area you will want to enter 'src/main/webapp' for the app root. This is where most jsp, html, javascrpt, css and whatnot will be. You will be able to update these and see the result. Now the last thing we need to do is activate the devloader. Here is a picture of what that looks like:
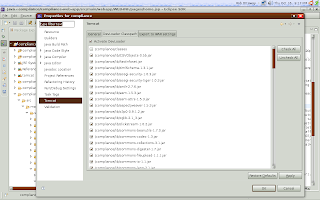
So really all you do is add the jar files needed. Thats it. Now save. If you are not going to create a context file yourself, and you enabled 'can update context definition' in the projects tomcat properties you can right click the project and select "tomcat project > update context definition". This will automatically create the proper context file for Tomcat, so that it uses the DevLoader and your project. You almost certainly will want to do this. Note you can further alter the automatically created context file afterwards.
Now the problem with the plugin out right is your project must be laid out like an exploded war... YUCK! This is because Sysdeo will be looking for the lib files under WEB-INF/lib and such. Often I've seen this lead to some truly horrible project organization, where jsp and Ant build files co-mingle in the same folder!?!
Most of us use a sane Ant or Maven project layout that is standardized across all our Java projects. If you want to continue doing so and leverage the benefits of Sysdeo then you will need the DevLoader installed.
If you haven't downloaded and installed the Sysdeo plugin do so now, I will wait ;)
Go here to get Sysdeo!
Ok once installed you should see 3 icons under the Eclipse menu bar that look very familiar (they are Tomcats!). The first icon starts Tomcat, the second stops it and the third restarts. Now open the Eclipse preferences menu. You should see the "Tomcat" entry. Open it and configure the plugin based on your Tomcat installation. You will want the "Context Declaration mode" to be "context" in my experience. It just makes things a lot cleaner if you use Tomcat for other projects/apps, where they each have individual files rather being crammed in server.xml. That should be about all you need to know. Oh the sub-menu 'Source path' is for adding the source files used in debugging, so make sure your project is in there if you want to be able to see the files while debugging.
Next up the DevLoader. It came with the Sysdeo plugin when you download it! You should find a zip file in the the Sysdeo zip aptly named Devloader.zip. Unzip it. It will create an org folder, within lies some classes. Jar this sucker up:
jar cf devloader.jar org/
This should create a jar for the DevLoader. Now throw this in your Tomcat instance's lib folder.
Great now you have almost everything you need to get started. Lets go over an example of a Maven project being used.
In Maven the webapp files go in src/main/webapp by convention, and sources go in src/main/java, and the resource files (xml, properties) go into src/main/resources. For your Maven project you would right click the project and select properties. You should now notice a 'Tomcat' entry in the config options. Select this.
Enable the "Is a Tomcat Project" checkbox. For the 'context name' use whatever sane value you prefer. Near the bottom area you will want to enter 'src/main/webapp' for the app root. This is where most jsp, html, javascrpt, css and whatnot will be. You will be able to update these and see the result. Now the last thing we need to do is activate the devloader. Here is a picture of what that looks like:

So really all you do is add the jar files needed. Thats it. Now save. If you are not going to create a context file yourself, and you enabled 'can update context definition' in the projects tomcat properties you can right click the project and select "tomcat project > update context definition". This will automatically create the proper context file for Tomcat, so that it uses the DevLoader and your project. You almost certainly will want to do this. Note you can further alter the automatically created context file afterwards.
Subscribe to:
Posts (Atom)